How to Insulate an Attic for Temperature and Vapor
Attic insulation plays a critical role in maintaining comfortable living conditions throughout the year. It acts as a double agent, controlling both temperature and moisture. Proper insulation reduces energy consumption for heating and cooling, keeping your utility bills low. It also protects the structural integrity of your building by preventing moisture buildup that can lead to mold growth and rot. Upgrading to high-performance insulation can significantly improve your home’s comfort and efficiency.
Here’s your guide to insulating your attic for optimal performance:
Types of Attic Insulation Materials
Several insulation materials are suitable for attics, each with its own advantages and disadvantages:
- Fiberglass: The most common and cost-effective option. Available in batts and loose-fill forms, fiberglass offers good thermal resistance (R-value) but can be susceptible to moisture absorption and settling over time.
- Cellulose: Made from recycled paper products, cellulose offers excellent thermal performance and sound insulation. It has superior moisture absorption properties compared to fiberglass but requires specialized equipment for installation.
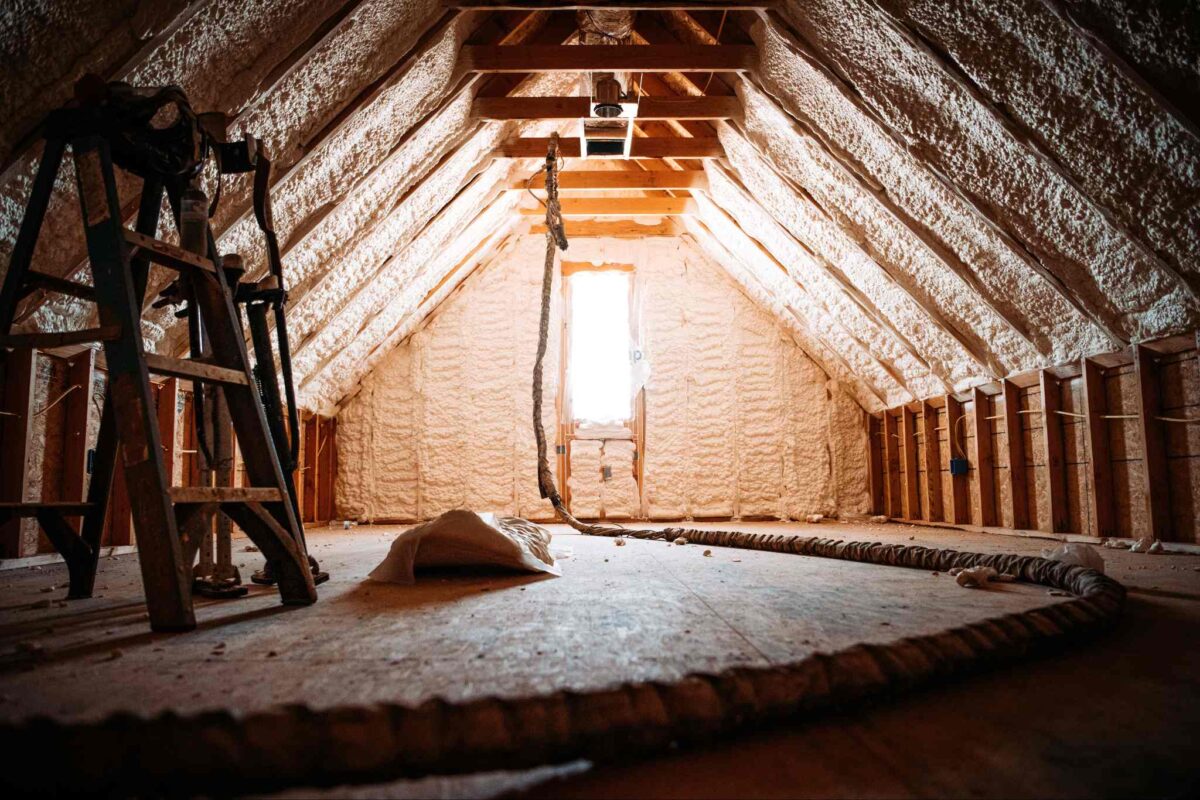
- Spray Foam: Polyurethane spray foam creates a seamless, air-tight barrier with exceptional R-value and moisture control. However, spray foam is more expensive than other options and requires professional installation.
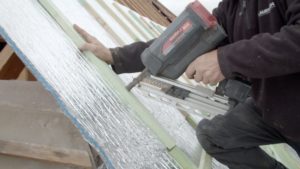
- Reflective Insulation: This type uses radiant barriers like aluminum foil to reflect heat rather than absorb it. While effective in attics with proper ventilation, reflective insulation alone may not provide sufficient thermal resistance in extreme climates.
Consider factors like climate, existing ventilation, budget, and desired R-value when choosing your insulation material.
Assessing Your Attic: Pre-Insulation Checks
Before beginning the insulation process, it is important to assess the current state of the attic. This involves several steps to ensure that the attic is ready for insulation and to identify any potential issues.
Check Existing Insulation: Determine if there is existing insulation in the attic and assess its condition. Old or damaged insulation should be removed to ensure the new insulation performs optimally.
Identify Moisture Issues: Look for signs of moisture, such as water stains, mold, or mildew. Address any leaks or sources of moisture before installing new insulation to prevent future problems.
Ensure Proper Ventilation: Adequate ventilation is crucial for maintaining air flow and preventing moisture buildup. Check that vents are unobstructed and functioning properly. Good ventilation helps to regulate temperature and reduces the risk of condensation.
How to Insulate an Attic Step by Step
Insulating an attic requires careful planning and execution. Follow these detailed steps to ensure a successful insulation project.
1. Prepare the Attic:
- Remove Debris and Old Insulation: Begin by clearing the attic of any debris, dust, and old insulation. Use protective gear to avoid exposure to dust and potential contaminants. Dispose of old insulation properly according to local regulations.
- Clean the Attic: Ensure the attic is clean and dry. Use a vacuum or broom to remove dust and debris from all surfaces, including between the joists. A clean attic ensures better adhesion of insulation materials and prevents future issues.
2. Seal Air Leaks
- Identify Air Leaks: Inspect the attic floor, walls, and ceiling for gaps, cracks, or holes. Common areas for leaks include around plumbing vents, electrical wiring, chimneys, and attic hatches.
- Seal with Caulk or Spray Foam: Use a high-quality caulk or spray foam to seal small gaps and cracks. For larger openings, use expanding spray foam. Ensure a tight seal around all penetrations to prevent air leakage and improve insulation effectiveness.
3. Install Insulation Baffles
- Choose Appropriate Baffles: Select baffles that are suitable for your attic’s design and ventilation requirements. Baffles, also known as rafter vents, help maintain airflow from soffit vents into the attic.
- Install Baffles Properly: Place baffles between the rafters near the eaves. Secure them with staples or nails, ensuring they extend from the soffit vents to the attic. Baffles prevent insulation from blocking the vents and ensure continuous ventilation.
4. Lay the Insulation
- Start at the Farthest Corner: Begin at the farthest corner of the attic and work towards the entrance. This prevents walking over the newly installed insulation and ensures even coverage.
- Install Loose-Fill Insulation: For loose-fill insulation, use a blower machine to distribute the material evenly. Ensure the insulation reaches the desired depth and covers all areas without gaps. Rake the insulation to achieve a uniform layer.
- Install Batts or Rolls: For batt or roll insulation, fit the pieces snugly between the joists. Cut the insulation to size using a utility knife, ensuring it fits tightly without gaps. Lay the batts or rolls in a continuous layer, avoiding compression.
5. Add Additional Layers
- Achieve Desired R-Value: If the initial layer of insulation does not meet the required R-value, add additional layers. Lay the new layers perpendicular to the first layer to cover any gaps and achieve uniform insulation.
- Avoid Compression: Be careful not to compress the insulation, as this reduces its thermal resistance. Fluff the insulation if necessary to maintain its loft and effectiveness.
6. Install a Vapor Barrier
- Determine the Need for a Vapor Barrier: Depending on the type of insulation used and the climate, you may need to install a vapor barrier. A vapor barrier prevents moisture from entering the insulation and causing condensation.
- Place the Vapor Barrier Correctly: Install the vapor barrier on the warm side of the insulation, facing the living space. Secure the barrier with staples or adhesive, ensuring it covers the entire insulated area without gaps.
- Seal Seams and Penetrations: Use appropriate tape or sealant to seal seams between vapor barrier sheets. Ensure a tight seal around any penetrations, such as pipes or wiring, to prevent moisture ingress.
Best Practices for Installing Vapor Barriers
Proper installation of vapor barriers is critical to preventing moisture penetration and condensation in the attic. Follow these best practices to ensure effective vapor control.
- Select the Right Barrier: Choose a vapor barrier with the appropriate perm rating for your climate. Higher perm ratings allow more moisture to pass through, while lower perm ratings provide a stronger barrier.
- Install Continuously: Ensure the vapor barrier covers the entire insulated area without gaps or overlaps. Use a continuous sheet for large areas and seal seams with appropriate tape or adhesive.
- Seal Penetrations: Carefully seal around any penetrations, such as pipes, vents, and wiring, to prevent moisture from bypassing the barrier. Use flexible sealants or gaskets to accommodate movement and expansion.
- Maintain Air Flow: Ensure that the vapor barrier does not obstruct ventilation. Proper ventilation helps to carry away any moisture that may penetrate the barrier, preventing condensation and mold growth.
Common Mistakes to Avoid During Attic Insulation
Avoiding common mistakes during the insulation process is essential for ensuring effective temperature control and vapor management.
- Inadequate Coverage: Ensure that insulation covers the entire attic floor uniformly. Gaps or thin spots in the insulation can significantly reduce its effectiveness.
- Blocking Ventilation: Avoid covering soffit vents or obstructing airflow with insulation. Proper ventilation is necessary to maintain temperature balance and prevent moisture buildup.
- Improper Sealing: Failing to seal air leaks can compromise the insulation’s performance. Thoroughly seal all gaps and penetrations to maximize energy efficiency.
- Overcompressing Insulation: Compressing insulation reduces its thermal resistance. Handle insulation materials carefully and avoid packing them too tightly.
Benefits of Using High-Performance Insulation Solutions
High-performance insulation materials like QUATTRO Insulation offer numerous advantages. QUATTRO Insulation is designed to meet the highest standards of insulation technology. It can be used as an insulation material, vapor barrier, and roof membrane. It is thin, multi-reflective, and has four layers of aluminum multi-layer insulation material, which is thermally-welded across all its surfaces. Aluthermo Quattro has a Fire Resistance Classification of ASTM E84 Class 1 / Class A, and EN 13501-1 BS1d0. This means that when it is exposed to extremely hot temperatures or flame, Aluthermo Quattro produces zero toxic or irritating burn gases, and the melted core does not leak out.
QUATTRO shows high performance on several levels:
- Durability: QUATTRO Insulation’s components are risk-free for the environment, making it a durable, non-toxic insulation material with an unrivaled lifespan.
- Strong Reflective Power: Due to the quality of its pure aluminum layers, QUATTRO reflects 96% of radiant heat. It has also been treated against oxidation.
- Air Impermeability: A very thin, flexible insulation material that comes in a roll, QUATTRO can be unrolled above or below the roof, wall, or floor to form an envelope that prevents energy loss caused by airflow.
- Sound Insulation: Due to its flexibility, QUATTRO is very acoustically effective. You will notice the difference when a rainstorm hits your metal roof.
Optimize Your Attic Insulation with QUATTRO Insulation
QUATTRO Insulation stands out for its unique properties, making it an ideal choice for attic insulation. It offers durability, strong reflective power, air impermeability, and sound insulation. By integrating these features, QUATTRO Insulation simplifies the insulation process, acting as an all-in-one solution for both temperature control and vapor barrier insulation needs.
Upgrade your attic insulation with Aluthermo QUATTRO for superior performance. Learn more and request a quote!